Assemble your LiV indoor air monitor
Step 1
Insert LiV expansion board into your Raspberry Pi. Use the standoffs and screws in your kit to secure the expansion board to the Raspberry Pi. For Raspberry Pi model 3, 2 or B+ you will need a 3mm drill to slightly enlarge the mounting holes on the Raspberry Pi (hole diameter is 2.75mm and there is a lot of room around them). If you don't want to enlarge the mounting holes, you can leave the screws out on the bottom of the Pi, so the standoffs just rests on the PCB.
Step 2
The next image shows how to connect the sensors, DS3231 RTC module and LCD display to your Raspberry Pi 3, 2 or B+. Insert CR2032 battery into the battery holder of the DS3231 RTC module before you plug it in. On the left side of the expansion board you can see the DS3231 RTC module and the BMP180 air pressure sensor. The black wire of the jumper cable in the pictures connects the GND pins on the PCB screen connector and the LCD screen. Your jumper cable might have different colours, however this is a straight cable so you should have no problems using it. Just to make things easier, the GND pin is marked on the PCB on one side of the screen connector. DHT22 temperature and humidity sensor is connected to the green connector close to the calibration switch. DHT22 has a 4 pin straight cable. The sensor should face down when you screw the cable into the green connector.
Step 1
Insert LiV expansion board into your Raspberry Pi. Use the standoffs and screws in your kit to secure the expansion board to the Raspberry Pi. For Raspberry Pi model 3, 2 or B+ you will need a 3mm drill to slightly enlarge the mounting holes on the Raspberry Pi (hole diameter is 2.75mm and there is a lot of room around them). If you don't want to enlarge the mounting holes, you can leave the screws out on the bottom of the Pi, so the standoffs just rests on the PCB.
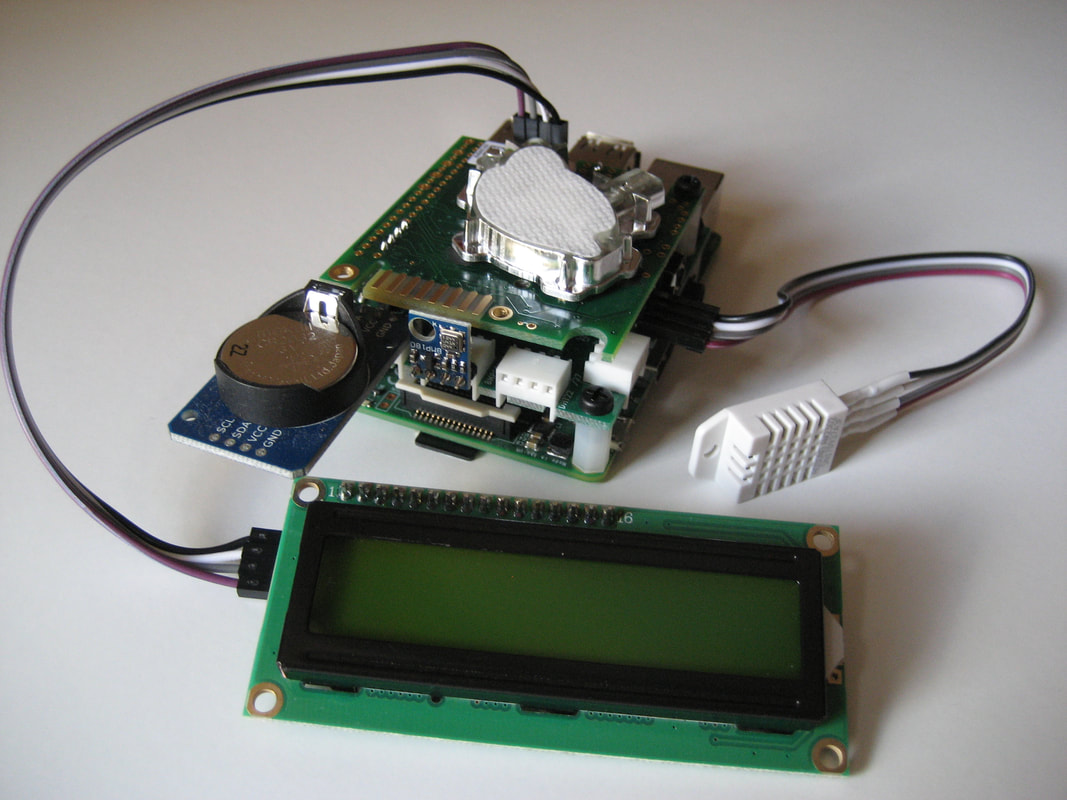
Step 2
The next image shows how to connect the sensors, DS3231 RTC module and LCD display to your Raspberry Pi 3, 2 or B+. Insert CR2032 battery into the battery holder of the DS3231 RTC module before you plug it in. On the left side of the expansion board you can see the DS3231 RTC module and the BMP180 air pressure sensor. The black wire of the jumper cable in the pictures connects the GND pins on the PCB screen connector and the LCD screen. Your jumper cable might have different colours, however this is a straight cable so you should have no problems using it. Just to make things easier, the GND pin is marked on the PCB on one side of the screen connector. DHT22 temperature and humidity sensor is connected to the green connector close to the calibration switch. DHT22 has a 4 pin straight cable. The sensor should face down when you screw the cable into the green connector.
Step 3
Insert SD card containing LiV bootable image into your Raspberry Pi.
Insert SD card containing LiV bootable image into your Raspberry Pi.
NOTE: Never use "reboot" command when working with LiV: you should use "sudo shutdown now" followed by power cycle (i.e. turn power off, then back on). When you use "reboot", the LCD display is not properly initialised and you will see some strange things on it when LiV boots. If you are doing development on livLCD process, you can get around this by starting livLCD process, killing livLCD process, then starting livLCD process one more time.
Step 4
Connect keyboard, mouse and computer monitor to your Raspberry Pi and power up. Do not connect any Ethernet cable yet.
It takes your Raspberry Pi about 40 seconds to boot up. After that, you should see the measurements on the LCD screen. Adjust LCD screen contrast with the potentiometer on the back of LCD screen if needed.
The first time LiV boots, the DS3231 module sets the time to a Jan 1st, 2000 date. Once LiV has an Internet connection, the time will be automatically sync-ed to the correct time and date (it takes about 15 minutes for this). More details on this in the "Setup LiV Pi hardware clock" page.
Step 5
The latest LiV Pi image comes configured for Raspberry Pi 3 and 2.
If you have a Raspberry Pi B+, you will see the value "-999" displayed on the LCD screen for temperature and humidity measurements. To fix this, you should open a terminal on your Pi, go to "/home/pi/liv/livDB/Adafruit_Python_DHT" directory and reinstall python package with "sudo python setup.py install" command. Wait a couple of minutes for a new LCD screen cycle: you should now see the correct readings for temperature and humidity.
If there are any missing measurements on the LCD screen (e.g. no CO2 measurements even if you have the CO2 sensor plugged in!) you should check that the sensor is configured ("Yes" value for that specific sensor under the "ON_BOARD_SENSOR" section in the "/home/pi/liv/livDB/livDB.config" file). The LiV Pi image that you download from our website is pre-configured for the Starter package, so you need to manually turn on the "Yes" value for CO2 sensor under the "ON_BOARD_SENSOR" in "livDB.config" file)
If you still see a "-999" value for temperature and humidity, you should check that you plugged your DHT sensor in one of the two DHT marked connectors on the board. Make sure the DHT 22 sensor has the correct orientation (face down). Check that the sensor has the correct GPIO number configured in the "TEMP_HUMIDITY_SENSOR" section in the "/home/pi/liv/livDB/livDB.config" file: gpio_no should be 17 if your DHT sensor is plugged into the connector close to the CO2 calibration switch and it should be 27 if the DHT 22 sensor is plugged into the connector on the same side with the DS3231 module.
Shut down ("sudo shutdown now") and power cycle after you are done editing "livDB.config" file.

Step 6
Set up your locales with "raspi-config" command (LiV image comes configured with Hong Kong time and US keybord layout).
Set up your locales with "raspi-config" command (LiV image comes configured with Hong Kong time and US keybord layout).
Step 7
Senseair K30 CO2 sensor calibration note:
K30 CO2 sensor was calibrated by the manufacturer so you don't need to calibrate the sensor when you first power up LiV Pi. K30 is a self-calibrating sensor: Senseair developed a method called Automatic Baseline Calibration (ABC). The theory behind ABC calibration is that for IAQ use, at some point each day a room is unoccupied or when the windows are open, the CO2 level should return to 400ppm, the same as outdoor air. By storing the lowest CO2 readings taken over time (typically several days) in EPROM memory, an offset to 400ppm could be calculated, then added or subtracted from the actual CO2 readings.
The advantage of ABC is that the CO2 sensor is self-calibrating over the life of the sensor. The disadvantage is that if the sensor never “reads” normal 400ppm air, over time it will display inaccurate CO2 levels. In time, if you suspect your sensor needs calibration (or if you accidentally pressed the CO2 calibration switch when LiV Pi was operating indoors) you should take your LiV outdoors, power up the device and press the CO2 calibration switch in order to perform 400ppm calibration.
